Dienstag, 18. April 2017

I ♥ Intarsia Washcloth

Want to show your affection for a special person with a small piece of knitting? Or to give your Mum a small but lovely washcloth for Mother's Day? Then this washcloth is perfect for you. It adds a special touch to your bathroom decorations or makes a great handmade gift for someone you love. This piece can be used as a potholder as well.
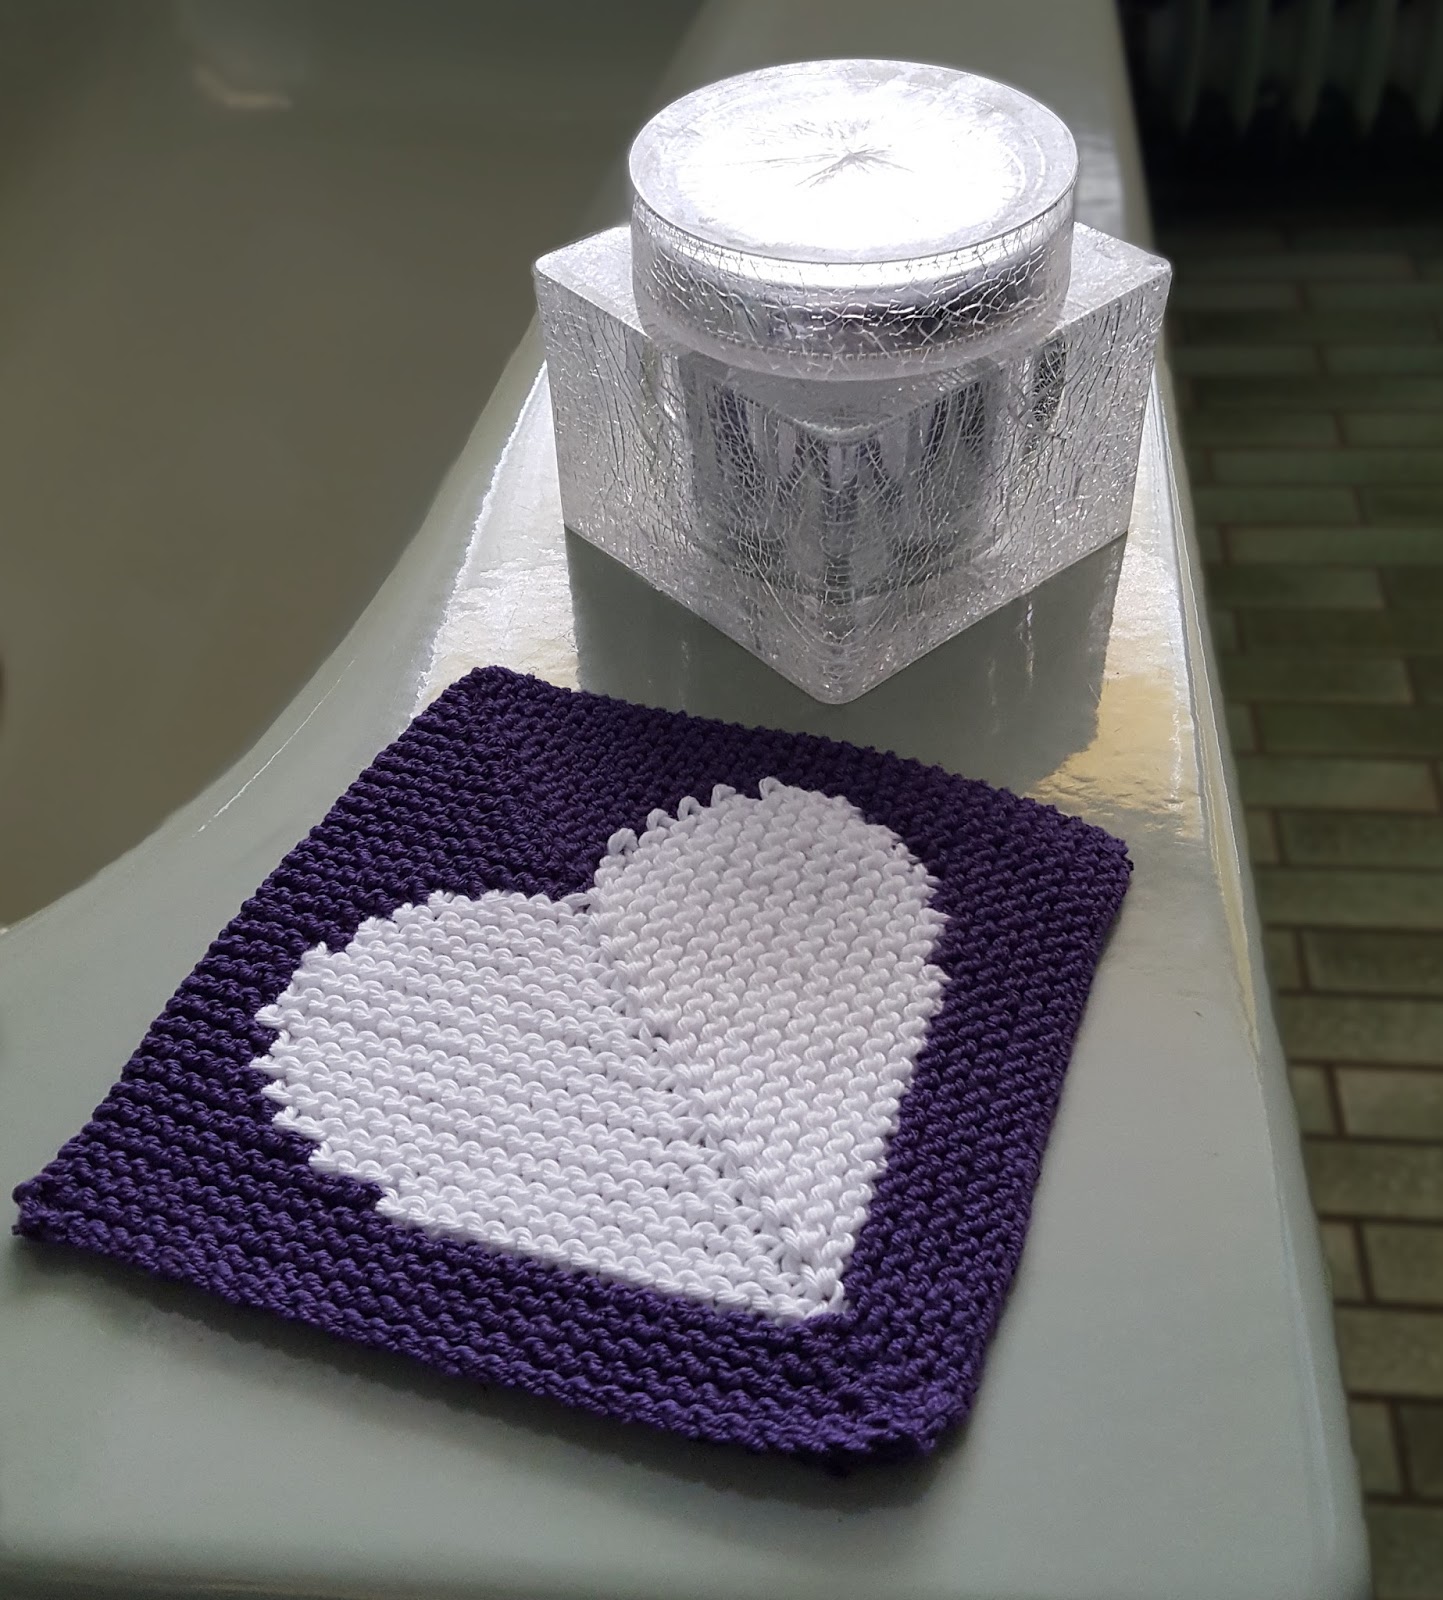
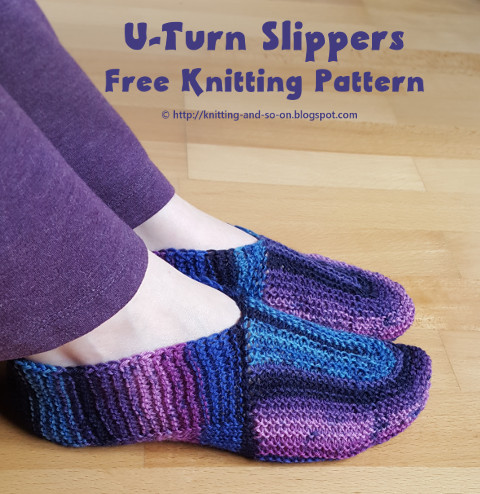
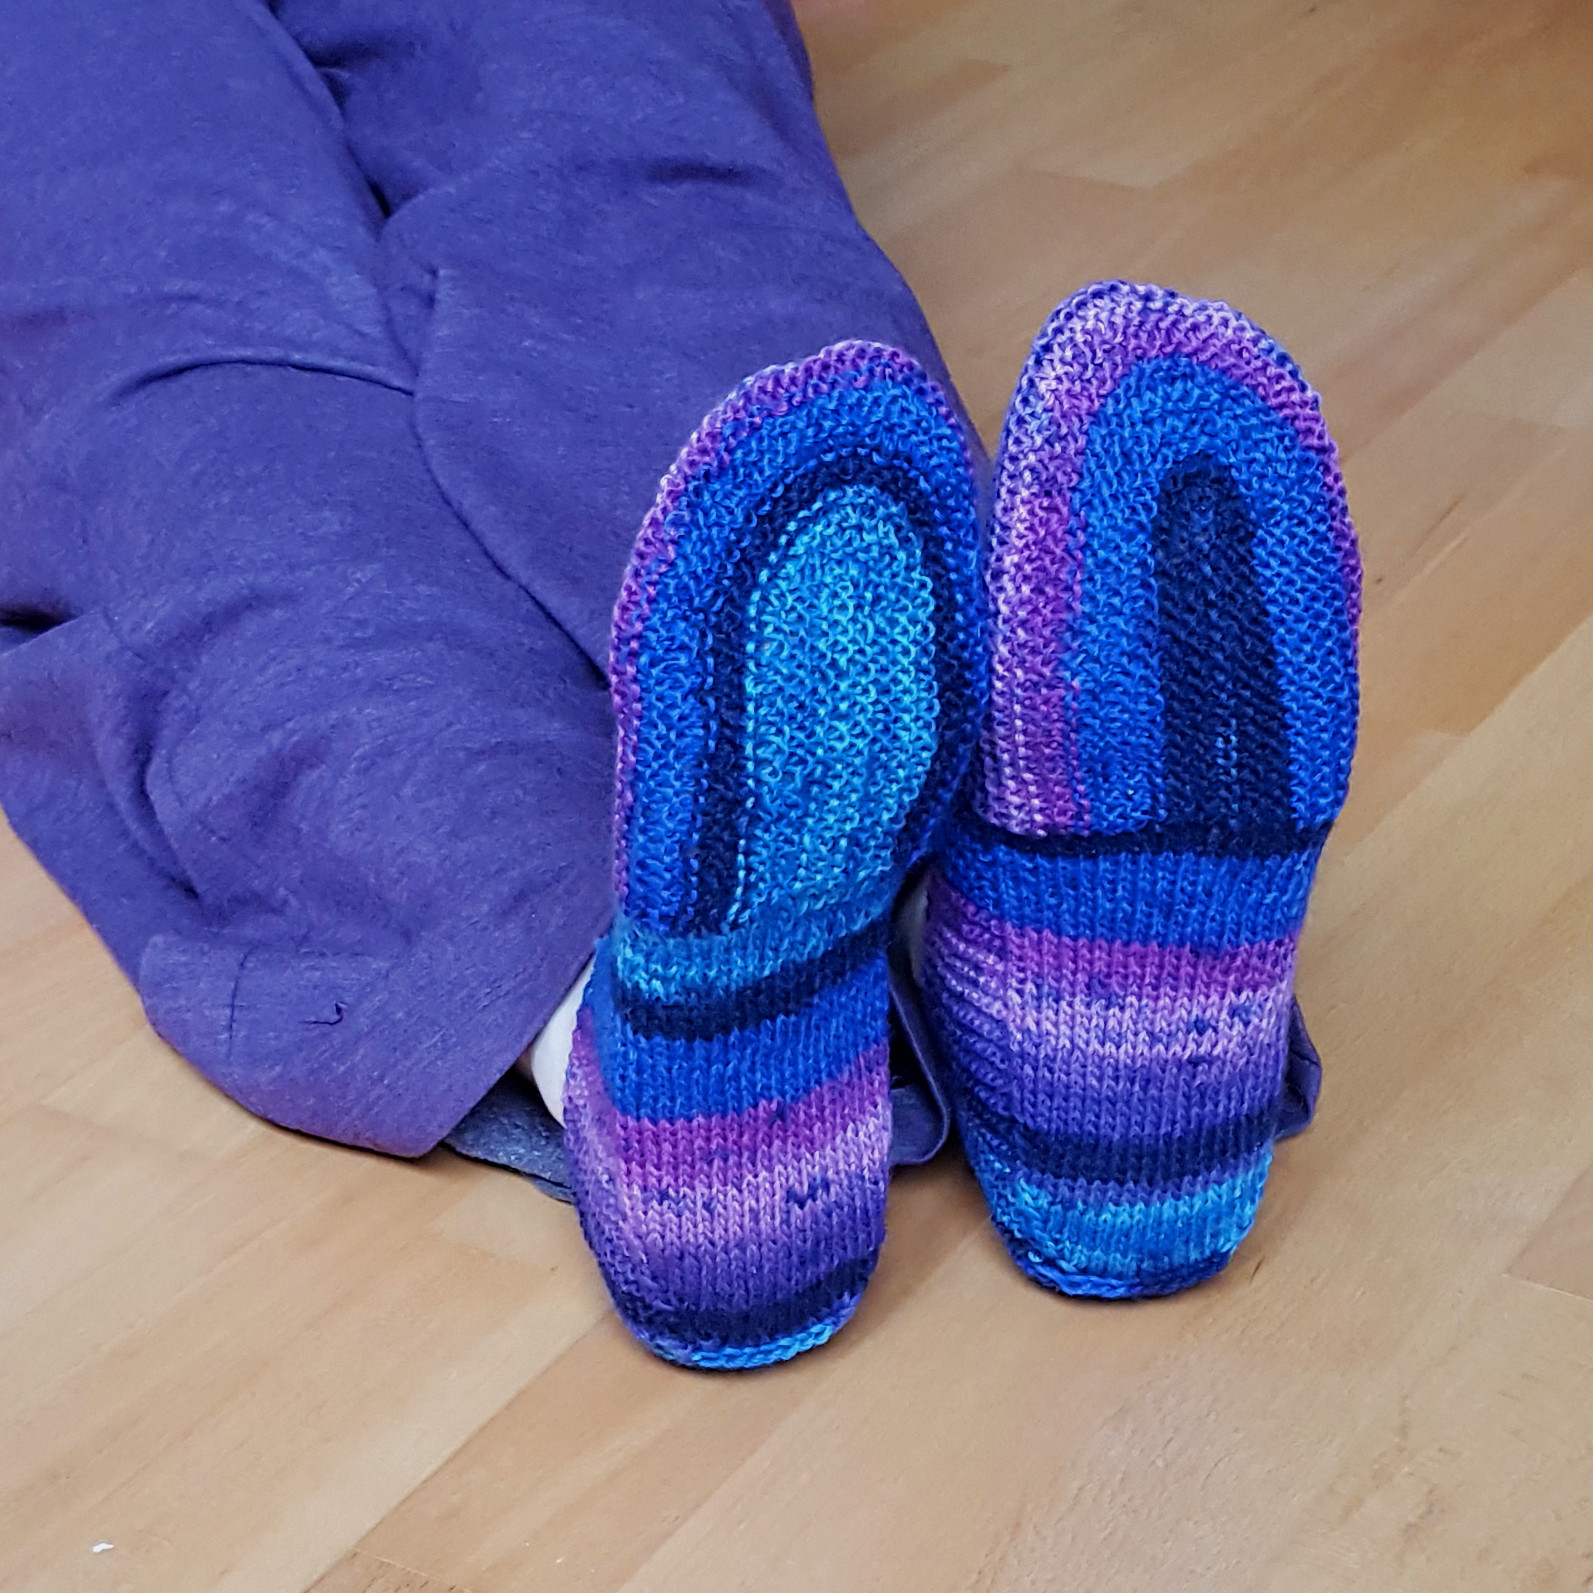
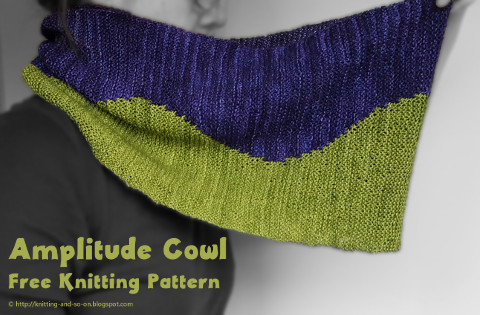
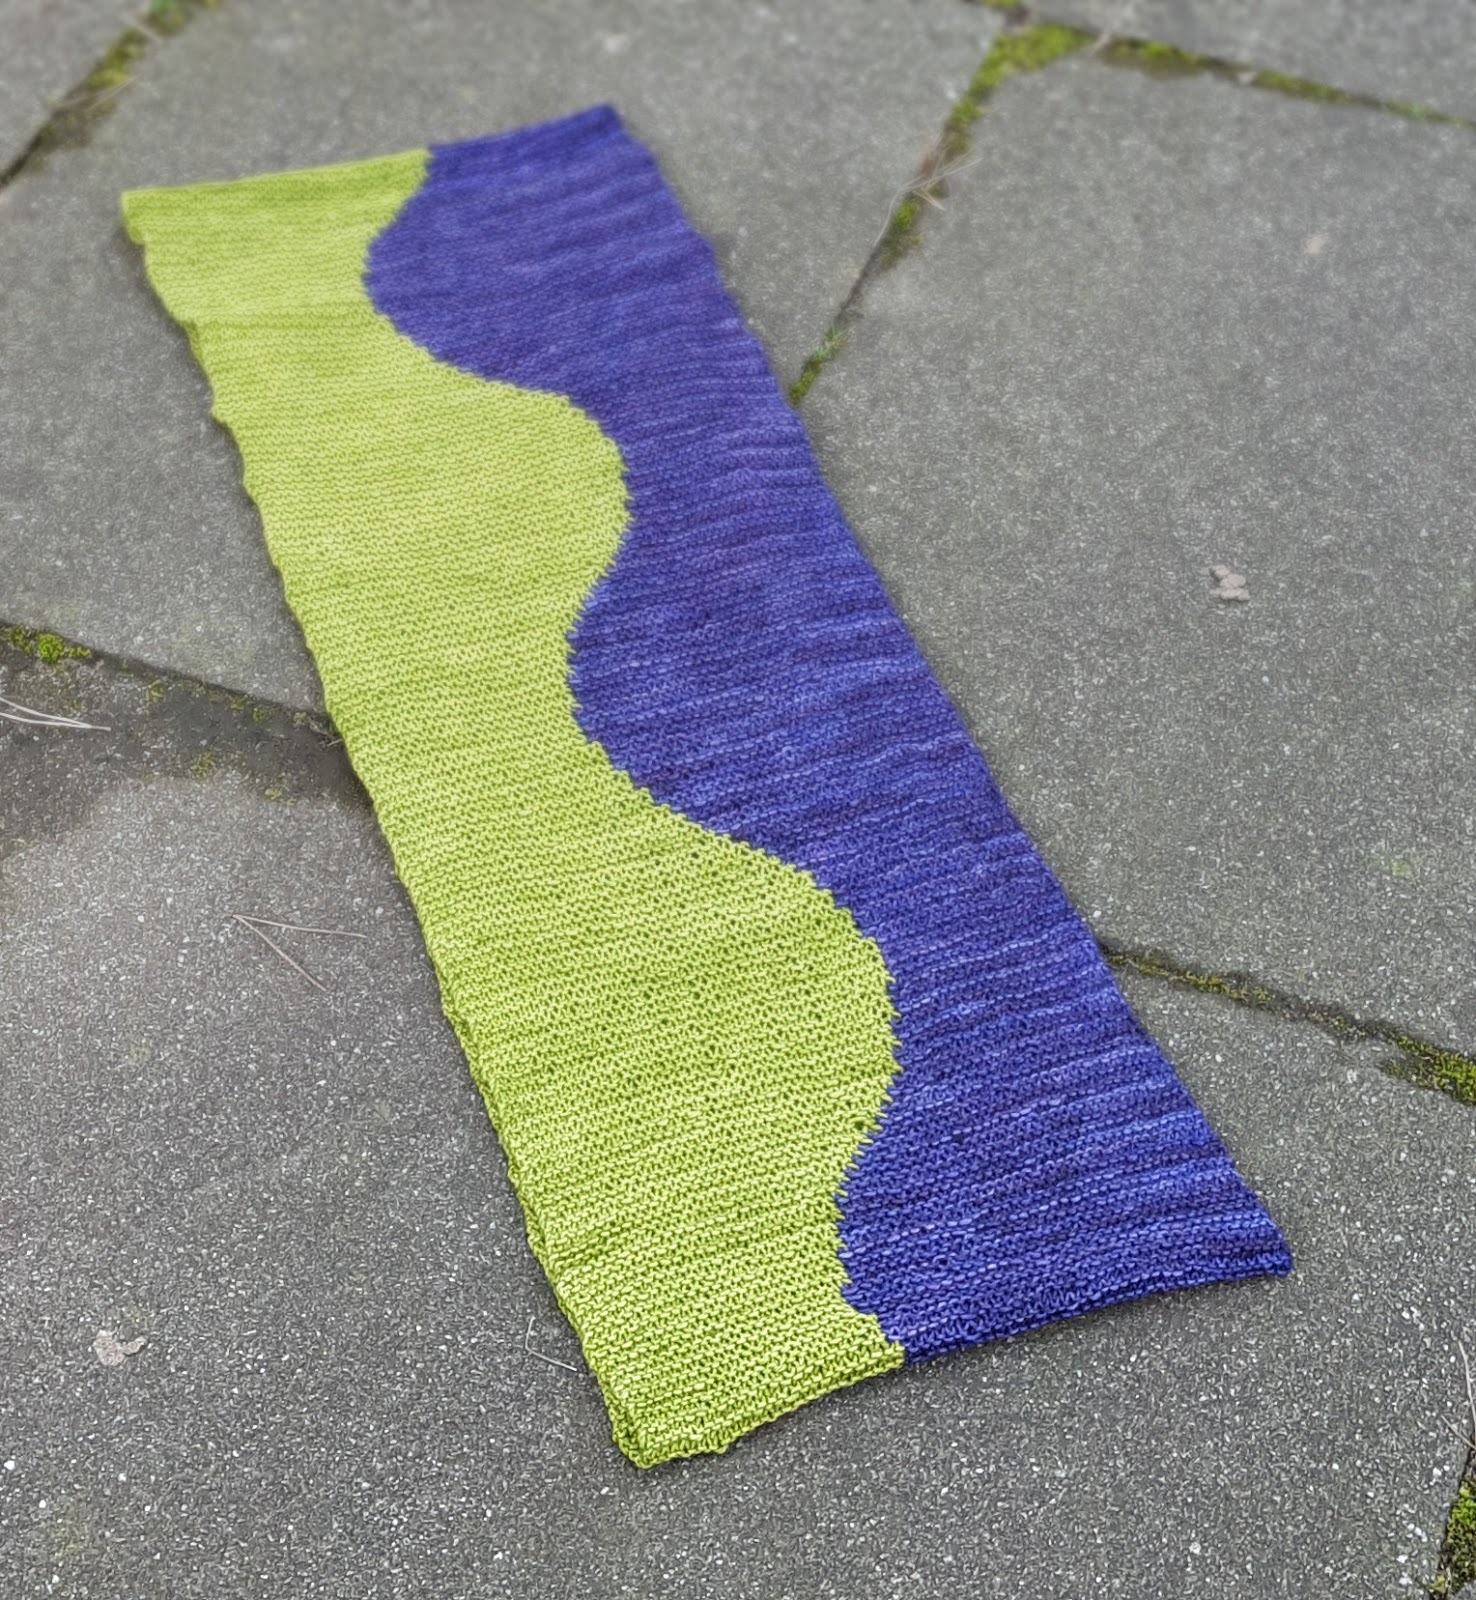
It's a fun project that can be finished within a few hours with a gorgeous heart effect. It's great if you want to learn a new technique, like short rows or intarsia.

Eine deutsche Version dieser Anleitung gibt es hier.
A german version of this pattern can be found here.

I ♥ Intarsia Washcloth - free knitting pattern

Creative Commons License
This work by Knitting and so on is licensed under a Creative Commons Attribution-NonCommercial-ShareAlike 4.0 International License.


Materials
  • about 30 - 40 grams of cotton yarn in two colors (called C1 and C2) - I used some old yarn that I think was Aran weight
  • needles that the yarn calls for - I used 4mm dpns

Size
The size depends on the yarn you use. The first I did (in Sport weight, with 3mm needles) measured 14 cm by 14 cm. The second one (Aran weight) measured 17 cm by 17 cm.
If you want to know beforehand, how big the piece is going to be cast on 32 sts and knit a few rows in garter stitch. The width you can measure now will be the finished piece's width and height.


Techniques and Notation
  • Intarsia: Changing colors with the intarsia technique - as shown in this YouTube video by knitwithpat; or this YouTube video by Francoise Danoy.
  • Short rows with wrap and turn (w+t) - as shown in this YouTube video by Very Pink Knits.
    Since this washcloth is knit in garter stitch, you don't have to pick up your wraps - except in two rows, i.e. the rows where the wrapping color is different from the color of the wrapped stitch. These rows are indicated in the pattern. Here's a YouTube video that shows how to pick up your wraps (also by Very Pink Knits).
  • Throughout the pattern, the following notation will be used: C1 (k4); C2 (k10, w+t, k10); C1 (k to end) means, knit 4 stitches in C1, change to C2 and knit 10 sts, do a wrap and turn, knit 10 stitches and then change back to C1 and k to end. I.e. color is indicated before the knitting instructions for that yarn. the knitting instructions for that yarn are given in brackets after the color and color changes are indicated by a semicolon.
  • Stranding yarn sideways and catching the secondary color - as shown in this YouTube Video by The Alpaca Yarn Company.
    From ridge 21 to ridge 44 you only use C1. To avoid a long yarn float on the piece's WS, you should catch the C2 yarn while knitting the RS of ridge 21. The pictures below show the difference - the important part is circled. While knitting the first washcloth (orange heart, left hand picture), I didn't catch the C2 yarn, that's why there is a long float on the WS, which is something to be avoided in pieces that are seen from both sides. When knitting the next one (red heart, right hand picture), I remembered to catch the C2 yarn over the three stitches with C1.  Here the WS looks much neater.

General Construction
First half: each row is one stitch shorter than the last one - until the last row is only 1 stitch long
Second half: starts with a row that's only one stitch long, each row is one stitch longer than the last one, until the last row is 32 stitches long.
The second half is knitted at a 90 degree angle to the first half. It's made up of the same rows than the first half, but with all rows knitted in reverse order.
The pattern is written in ridges - on the WS each stitch is always knitted in the color of the underlying RS stitch.

I ♥ Intarsia Washcloth - free knitting pattern

Instructions

CO32
Setup Row: k all
Ridge 1: C1 (k to 1 st bef end, w+t, k to end)
Ridge 2 to 5: C1 (k to 1 st bef last wrapped st, w+t, k to end)
Ridge 6: C1 (k12); C2 (k15, w+t, k15); C1 (k12)
Ridge 7: C1 (k9); C2 (k17, w+t, k17); C1 (k9)
Ridge 8: C1 (k7); C2 (k18, w+t, k18); C1 (k7)
Ridge 9: C1 (k6); C2 (k18, w+t, k18); C1 (k6)
Ridge 10: C1 (k5); C2 (k18, w+t, k18); C1 (k5)
Ridge 11: C1 (k5); C2 (k17, w+t, k17); C1 (k5)
Ridge 12: C1 (k4); C2 (k17, w+t, k17); C1 (k4)
Ridge 13: C1 (k4); C2 (k16, w+t, k16); C1 (k4)
Ridge 14: C1 (k4); C2 (k15, w+t, k15); C1 (k4)
Ridge 15: C1 (k4); C2 (k14, w+t, k14); C1 (k4)
Ridge 16: C1 (k5); C2 (k12, w+t, k12); C1 (k5)
Ridge 17: C1 (k5); C2 (k11, w+t, k11); C1 (k5)
Ridge 18: C1 (k6); C2 (k9, w+t, k9); C1 (k6)
Ridge 19: C1 (k7); C2 (k7, w+t, k7); C1 (k7)
Ridge 20: C1 (k9); C2 (k4, w+t, k4); C1 (k9)
Ridge 21: C1 (k to 1 st bef last wrapped st (stranding C2 over the last 3 sts), w+t, k to end)
Ridge 22 to 31: C1 (k to 1 st bef last wrapped st, w+t, k to end)
Ridge 32: C1 (k1, w+t, k to end)

I ♥ Intarsia Washcloth - free knitting pattern


Now you basically knit all the ridges you just knitted again, but in reverse order.
Ridge 33:  k1, w+t, k to end
Ridge 34 to 44: C1 (k to 1 the first wrapped st, knit this stitch, w+t, k to end)
Ridge 45: C1 (k9); C2 (k3, pick up wraps and k1, w+t, k4); C1 (k9)
Ridge 46: C1 (k7); C2 (k7, w+t, k7); C1 (k7)
Ridge 47: C1 (k6); C2 (k9, w+t, k9); C1 (k6)
Ridge 48: C1 (k5); C2 (k11, w+t, k11); C1 (k5)
Ridge 49: C1 (k5); C2 (k12, w+t, k12); C1 (k5)
Ridge 50: C1 (k4); C2 (k14, w+t, k14); C1 (k4)
Ridge 51: C1 (k4); C2 (k15, w+t, k15); C1 (k4)
Ridge 52: C1 (k4); C2 (k16, w+t, k16); C1 (k4)
Ridge 53: C1 (k4); C2 (k17, w+t, k17); C1 (k4)
Ridge 54: C1 (k5); C2 (k17, w+t, k17); C1 (k5)
Ridge 55: C1 (k5); C2 (k18, w+t, k18); C1 (k5)
Ridge 56: C1 (k6); C2 (k18, w+t, k18); C1 (k6)
Ridge 57: C1 (k7); C2 (k18, w+t, k18); C1 (k7)
Ridge 58: C1 (k9); C2 (k17, w+t, k17); C1 (k9)
Ridge 59: C1 (k12); C2 (k15, w+t, k15); C1 (k12)
Ridge 60:  C1 (k to 1 the first wrapped st, pick up wraps and knit this stitch, w+t, k to end)
Ridges 61 to 64: C1 (k to 1 the first wrapped st, knit this stitch, w+t, k to end)
Last Row: BO loosely


Chart
Here's a charted version of the pattern. The purple arrows indicated the knitting direction. The cloth is started at the lower triangle. The numbers next to the ridge numbers indicate how many stitches there are of colors 1 and 2 - written in black and red respectively.
I ♥ Intarsia Washcloth - free knitting pattern
Chart - click to enlarge


This blogpost was featured at the Linky Ladies Community Link Party No. 102. Thank you!
Linky Ladies

Donnerstag, 13. April 2017

Mermaid's Garden Scarf

This scarf was knitted as a birthday present for a friend of mine. She chose the yarn and I designed and knitted it. Short rows are used to create a light wavy pattern. Lace rows inbetween create a bubbly effect. Since it is basically all garter stitch with a simple lace pattern inbetween, it's easy to knit but has a stunning effect.


The pattern is available for purchase on


It contains written instructions as well as illustrations how the short rows stack up.


Besides garter stitch you need the following skills to knit this scarf:
  • Basic lace stitches: i.e yo (yarn over), k2tog (k2 together), ssk (slip slip knit)
  • Short rows with double stitches (also called German Short Rows): when you turn, bring yarn to the front and pull it back so that both legs of the stitch are visible on your neeedle, i.e. a double-stitch is created, then knit back as usual - when you have to knit the double-stitch, be careful to knit it as one stitch (see also this YouTube video by leethal knits).
    In addition, the pattern explains how to adapt it to use the "wrap and turn"-method, as well.


Materials needed to knit this scarf
  • about 200 grams of fingering weight yarn – something with a long color gradient (I used two skeins of Lang Yarns Jawoll Magic Dégradé), but a solid color will look fine, too
  • 3.5 mm needles – I used circulars, but straight needles will do as well
  • 5 stitch markers
  • a removable stitch marker can be used to mark the RS which is helpful when doing the short row sequences
  • a tapestry needle to weave in ends

Size
The finished piece measures about 46 cm in width and 170 cm in length.


This blogpost was featured at Oombawka Design's 190th Link & Share Wednesday Link Party. Thank you! 
Oombawka Design

Mittwoch, 5. April 2017

U-Turn Slippers

I'm back to knitting slippers again. As usual, I tend to prefer constructions that are a bit out of the ordinary (such as the Undecided Slippers I published last year).
These slippers are knitted in a U-Turn shape around the tip of your foot. They are constructed in one piece, i.e. there are only two ends to weave in per slipper. The pattern comes out best when using variegated yarn, e.g. colorful sock yarn.


Creative Commons License
This work by Knitting and so on is licensed under a Creative Commons Attribution-NonCommercial-ShareAlike 4.0 International License.


Materials
  • 3.25mm circular needles (even though everything is knitted back and forth)
  • about 40 grams of fingering weight yarn
  • a third needle for the three-needle-BO
  • tapestry needle  to weave in ends
  • 3 stitch markers 
  • a safety pin to secure your stitch while turning the piece right sides out


Techniques & Notation
  • Judy's Magic Cast-On is a technique that gives you live stitches on both sides of your needle - it is generally used for toe-up socks (e.g. in this pattern), but it can be used for other purposes as well. Here's a written description (from Knitty) and here's a YouTube-video by Cat Bordhi and another YouTube-video by Very Pink Knits.
  • Picking up stitches from the side: Without your working yarn, insert the needle into the front leg of the edge stitch from back to front. A photo how this looks like, is shown in a post regarding the short wave mitts. Here’s a Knitty-article that explains picking up stitches in detail (also the difference between "picking up" and "picking up and knit"): http://www.knitty.com/ISSUEwinter04/FEATwin04TT.html
  • Three-Needle Bind-Off: https://youtu.be/Ph93jWSzTa0
  • Knitting a flat circle - or in case of this pattern a semicircle: The technique for knitting a flat circle has been described a few times on this blog, e.g. in the "Zoom Out Mitts"-Post. Basically it consists of doing 8 increases (evenly spaced out in one round) every other row, and varying the starting point for the first increase to avoid an octagon pattern. 
    In this pattern only a semicircle is knitted. This means that there will be only 4 increases on every RS row - and they will be started at a random stitch within the first quarter of the half circle.
    In this pattern you will be asked to increase (or decrease) by 2 from one point in your knitting to another. This means that you can randomly distribute the increases (or decreases) between the two given points (stitch markers)
    As an increase I used kfb and as decrease I used ssk, but you can use other stitches as well, e.g. a make 1 knit stitch (mk1) as increasing stitch or a k2tog as a decrease stitch.

Gauge and What You Need to Measure
  • I had a gauge of about 5 sts to 2 cm in width and 5 garter stitch ridges (10 rows) to 2 cm.  With this gauge and with a CO of 2x18 sts, the cast on of the tip will be 8 cm long, The tip will grow by 1/4 of the circumference you measured. You can adjust the length of this part by casting on more or fewer stitches.
  • The pattern is written in a way that you can adapt it to the width and length of your feet. As an example I will give the numbers I had for my feet (in purple).
  • Before you start, measure around the widest point of your feet (i.e. the circumference) and the length of your feet.

Construction
The slippers is constructed in two parts - the tip and the heel. Both are knitted flat.
It is started at the sole of the tip by doing a magic cast on. Then you knit around that CO in a U-shape making semicircle increases at the tip until the straight egde is half as wide as the circumference of your feet. Then you basically knit the same rows you just knitted backwards, i.e. doing semicircle decreases until the two sides meet and join them with a three-needle bind-off.
To start the heel part, stitches are picked up and knit from the straight edge of the tip part. Then you knit back and forth until you start decreases for a round heel. After some decreases, you only work one side part until the two sides meet. Another three-needle BO closes the heel.
The picture on the right shows a slipper as seen from both the top and the side.


Instructions

Tip
CO 2x18 stitches with the magic CO (i.e. there are 18 stitches on each needle)

Now turn your needles around in a way that you're looking at the garter stitch bumps.
All rows of the tip will be knitted in a U-shape, i.e. you knit the stitches on the first needle turn the piece upside down (this point will be called turning-point ("TP") and knit the stitches on the other needle. Then you turn your knitting to the WS and knit back.

Row 1 (WS): k16, pm, k2, TP, k2, pm, k16
Row 2 (RS): sl1, k to m, increase by 2 sts between m and TP, TP, increase by 2 sts between TP and m, k to end
Row 3 (WS): sl1, k all
Repeat rows 2 and 3 until the straight edge is wide enough to fit half way around your feet. Your piece should look similar to the one depicted in photo 1.
Repeat row 3 once more.

(For the slippers in the pictures, I did a total of 9 increase rows.)

Now you basically knit the same backwards, i.e. for each increase row you knitted before, you will now knit a decrease row. Spelled out this means:
Row 5 (WS): sl1, k all
Row 6 (RS): sl1, k to m, decrease by 2 sts between m and TP, TP, decrease by 2 sts between TP and m, k to end
Repeat rows 5 and 6 until there are only 2 sts left between each marker and the TP.
Row 7: sl1, k to TP

Do a three needle BO, keep the last stitch and turn the tip rights sides out, i.e. that the rigde from the three needle BO is on the inside (see photo 2).

Heel

Starting from only leftover stitch, pick up and knit stitches along the rim of the tip - one stitch per garter stitch ridge (see photo 4).

Count the stitches and devide the number by 4 (this number will be called X). In row 1, you will place two markers, one X stitches away from the beginning of the row and another X stitches away from the end of the row. The piece should look similar to the one in photo 4.  (I had a total of 43 stitch, 1 leftover, 42 picked up. so I distributed them as follows: 11-21-11 where the 21 stitches made up the sole and both 11 stitches the sides).

Row 1 (inside) : sl1, k X-1 sts, place marker, p to last X sts, place marker, k to end
Row 2 (outside): sl1, kfb, k to last 2 sts bef end, kfb, k1
Row 3 (inside): sl1, k to marker, p to marker, k to end
Repeat rows 2 and 3 three times more.

Row 4 (outside) = sl1, k to end
Row 5 (inside) = Row 3
Then repeat rows 4 and 5 until the length of the slippers are  4 cm short of the total length of your feet.

Now start with the heel decreases:
Row 6 (outside): sl1, k to marker, ssk, k to 2 sts before marker, k2tog, k to end
Row 7 (inside): sl1, k to marker, p to marker, k to end
Repeat rows 6 and 7 four more times.

From now on only one of the side parts (in garter stitch) is worked, the stitches between the markers will be decreased row-by-row and the second garter stitch bit will not be worked until it is joined with the opposite side at the end.

Row 8: sl1, k to 1 bef marker, ssk, replace marker, turn, sl1, k to end
Repeat row 8 until there are only 2 stitches between the two markers.

Then knit the following last ridge: sl1, k to 1 bef marker, remove marker, and do a central double decrease as follow: ssk, slip the last stitch back onto the lefthand needle and slip the next stitch over the former ssk. Leave this stitch on the lefthand needle. Then turn, and k to end.

Distribute the remaining stitches evenly on two needles. Your piece should now look similar to photo 5. Finish with a three-needle bind off on the inside of the slipper (see photo 6).

Turn the heel back right sides out.
Weave in ends.
Make two.


This post was features at Oombawkadesign's 194th Wednesday Link & Share Link Party. Thank you!
Oombawka Design

Donnerstag, 30. März 2017

Candy Corners

Add a sparkle of color to your spring outfit with this light and playful scarf. It is easy to knit because it consists of garter stitch short rows alternated with a lace pattern. As with nearly all short row patterns, it's great to show off your variegated yarn.


This pattern is available for purchase 


The pattern PDF is 5 pages long and contains written instructions and some illustrations explaining the short rows.


Skills Needed
Besides the plain knit stitch (garter stitch) you need the following skills to knit this scarf:
  • Short rows with wrap and turn (w+t)
  • Decrease with slip-slip-knit (ssk), alternatively you can use a k2tog
  • Increase with yarn-over (yo)


Materials
  • 300 grams of DK weight yarn - the yarn I used for the scarf in the pictures is Austermann Step 6 Irish Rainbow Colors (link to the yarn's Ravelry page)
  • 4mm needles (straight or circulars)
  • 1 stitch marker
  • tapestry needle to weave in ends


Gauge and Size
Unblocked my gauge was as follows: 10 sts and 21 rows gave 5 cm. Unblocked the scarf measured 140 cm x 33 cm, blocked it grew to 170 cm x 36 cm


This pattern was featured at Oombawka Design's 188th Link and Share Wednesday Link Party and at the Crafty Love Link Party #21 at the Undergroud Crafter. Thank you!

Oombawka Design

Donnerstag, 23. März 2017

Another Intarsia Experiment

After my last two intarsia knitting projects (Ice Maiden Cowl and Amplitude Cowl) I decided that it would be funny to take it up a notch, i.e. incorporating other design elements as well. And I decided to add some holes to the mix.

Here's what I came up with: A three-color design with a middle line that winds around small crescent shaped holes. I really like the effect around the middle line, but not the overall piece (yarn type, overall shape etc.). Therefore, the piece in the picture will be frogged, but the basic idea (i.e. wiggly line in the middle with the small holes) will be used in another project.


Mittwoch, 15. März 2017

Mesuneko Hat - A Swatchless Take on the PussyHat Theme

A friend asked me to knit a PussyHat for her (see PussyHat project page for more information). And since I'm not the kind of person to follow a pattern, I started doing it my way. In any case, I like to knit with yarn that's not so bulky (fingering weight for preference) and I only found one pattern for a PussyHat in fingering weight. Plus, I prefer patterns where you can start knitting without any measuring and swatching. And that's just what I did. I started knitting the ribbing sideways and held it around my head to see whether it was long enough. That's why the hat is knitted in two directions: first the ribbing is knitted sideways and flat - then, the main part is knitted bottom-up and in the round.

In the end, I knitted one hat in Fingering and one in DK weight. The first hat was in Fingering weight and knitted on slightly too big needles (i.e. the ones I usually use to get a nice and light texture) - so the fabric wasn't stiff enough to make the "ears" stick out. So tinked the last rows and did the three-needle BO from the outside. The crisp upper edge made the ears stick out better. Furthermore, I knitted a second one with DK weight yarn and needles that were slightly smaller than what the yarn called for - and that worked quite well to get the PussyHat look.

Yes, I know, it's rather late in the day to publish a PussyHat pattern ... but anyway, here's my take at the PussyHat theme.

Mesuneko (メス猫) is the japanese word for a female cat.


Creative Commons License
This work by Knitting and so on is licensed under a Creative Commons Attribution-NonCommercial-ShareAlike 4.0 International License.


Materials
  • about 80 grams of DK weight yarn - however, the pattern is written in a way that it can easily adapted to other yarn weights
  • 3.25mm needles (straight or circular)
  • 3.75mm needles (circulars or dpns)
  • a third needle for Three-Needle Bind-Off
  • a tapestry needle to weave in ends

Techniques
  • Provisional Cast-On: This method of cast-on usually uses some waste yarn that can be remove later to get live stitches, these stitches can either be used to continue knitting in the opposite direction or to graft these stitches to the rest of your piece. My favourite method is the one using a crochet hook (http://www.youtube.com/watch?v=UeExgbgTOgs). The first time you use your working yarn, will be called setup row in this pattern.
  • Three-Needle Bind Off: The three needle bind-off is used to attach two pieces of knitting (or to ends of one piece of knitting) to one another - this technique is shown in this YouTube Video - alternatively you can close the upper edge with Stockinette Grafting (Kitchener Stitch). Here’s a video from knittinghelp.com that shows the technique.
  • Picking up stitches from the side and knitting them (pick up and knit): https://youtu.be/4XtGL8vJf-g or https://youtu.be/htAHtNnuE7Q or https://youtu.be/oUPhLYkC0Fw 
Instructions

Ribbing
Provisionally CO 20 sts (if you use heavier yarn (e.g. bulky), I'd advise to cast on less stitches for the ribbing).
Setup Row: k all
Row 1: sl1 wyif (p-wise), k to end
Row 2: sl1 wyif (p-wise), p to end
Row 3: sl1 wyib (k-wise), p to end
Row 4: sl1 wyib (k-wise), k to end
Repeat rows 1 to 4 until the brim fits around your head when stretched - end with a row 3.
Put stitches from provisional CO on another needle. Hold ends together and do a three needle BO. Do not bind off the last stitch.

Main Part
Starting from the leftover stitch pick up and knit stitches all around the rim (from the side of the ribbing). Per 8 rows of ribbing, pick up 5 sts (see picture to the right). Then go on knitting in the round in stockinette stitch until the hat is as high as you want it to be.

For me this was the case, when the whole of the hat (ribbing plus main part) measured xx cm in height.

Distribute your stitches evenly on two needles and do a three-needle bind off - if you do this from the outside, the ears will stick out more prominently.

Weave in ends and enjoy wearing your hat!


Donnerstag, 9. März 2017

Amplitude Cowl

I like cowls that are knitted flat. A technique that's better used on flat pieces than on pieces worked in the round is intarsia. Here's a new pattern for a knitted cowl with a wavy intarsia pattern in shape of a sinus curve. It's all in garter stitch and therefore very easy to knit.


Creative Commons License
This work by Knitting and so on is licensed under a Creative Commons Attribution-NonCommercial-ShareAlike 4.0 International License.


Materials
  • 100 grams of fingering weight yarn in color 1 (C1)
  • 100 grams of fingering weight yarn in color 2 (C2)
  • 3.5mm knitting needles - if you're using circulars you'll need another needle of roughly the same size (for grafting)
  • a stitch marker
  • a tapestry needle (for grafting)

Techniques and Notation
  • Provisional CO: My favorite method for a provisional CO is the crochet provisional CO - it is shown in this Youtube video by New Stitch a Day.
  • Intarsia: Changing colors with the intarsia technique - as shown in this YouTube video by knitwithpat; or this YouTube video by Francoise Danoy.
  • Grafting in Garter Stitch: A technique to get an invisible (knitted) seam - this technique is shown in this YouTube Video by knittinghelp.com. 
  • Throughout the pattern, the following notation will be used: k31 (C1); k29 (C2) means knit 31 stitches in color 1 and then 29 stitches in color 2 - i.e. color is indicated in brackets after the stitches and color changes are indicated by a semicolon.

Gauge and Size
9 ridges (i.e. 18 garter stitch rows) gave about 5 cm in height, and 11 stitches about 5 cm in width.
The cowl I knitted (with a total of 5 pattern repaeats) measures 24 cm in width and 140 cm in circumference.
If you have different gauge or want another width, cast on the appropriate (even) number of stitches and place the stitch marker in the middle of the row. To adjust for lenght, knit a different number of pattern repeats.


Instructions

Provisionally CO60 sts
Setup Row 1: (C1) k30, place marker (C2) k30
Ridge 1: (C1) k to m, k1, (C2) k to end;
   turn; (C2) k to 1 bef m, (C1), k to end
Ridge 2: (C1) k to m, k2, (C2) k to end;
   turn; (C2) k to 2 bef m, (C1), k to end
Ridge 3: (C1) k to m, k3, (C2) k to end;
   turn; (C2) k to 3 bef m, (C1), k to end
Ridge 4: (C1) k to m, k4, (C2) k to end;
   turn; (C2) k to 4 bef m, (C1), k to end
Ridge 5: (C1) k to m, k5, (C2) k to end;
   turn; (C2) k to 5 bef m, (C1), k to end
Ridge 6 = Ridge 5
Ridge 7: (C1) k to m, k6, (C2) k to end;
   turn; (C2) k to 6 bef m, (C1), k to end
Ridge 8 = Ridge 7
Ridge 9: (C1) k to m, k7, (C2) k to end;
   turn; (C2) k to 7 bef m, (C1), k to end
Ridge 10 = Ridge 9
Ridge 11 = Ridge 9
Ridge 12: (C1) k to m, k8, (C2) k to end;
   turn; (C2) k to 8 bef m, (C1), k to end
Ridge 13 = Ridge 12
Ridge 14 = Ridge 12
Ridge 15 = Ridge 12
Ridge 16 = Ridge 9
Ridge 17 = Ridge 9
Ridge 18 = Ridge 9
Ridge 19 = Ridge 7
Ridge 20 = Ridge 7
Ridge 21 = Ridge 5
Ridge 22 = Ridge 5
Ridge 23 = Ridge 4
Ridge 24 = Ridge 3
Ridge 25 = Ridge 2
Ridge 26 = Ridge 1
Ridge 27: (C1) k to m, (C2) k to end;
   turn; (C2) k to m, (C1), k to end
Ridge 28: (C1) k to 1 bef m, (C2) k to end;
   turn; (C2) k to m, k1, (C1), k to end
Ridge 29: (C1) k to 2 bef m, (C2) k to end;
   turn; (C2) k to m, k2, (C1), k to end
Ridge 30: (C1) k to 3 bef m, (C2) k to end;
   turn; (C2) k to m, k3, (C1), k to end
Ridge 31: (C1) k to 4 bef m, (C2) k to end;
   turn; (C2) k to m, k4, (C1), k to end
Ridge 32: (C1) k to 5 bef m, (C2) k to end;
   turn; (C2) k to m, k5, (C1), k to end
Ridge 33 = Ridge 32
Ridge 34: (C1) k to 6 bef m, (C2) k to end;
   turn; (C2) k to m, k6, (C1), k to end
Ridge 35 = Ridge 34
Ridge 36: (C1) k to 7 bef m, (C2) k to end;
   turn; (C2) k to m, k7, (C1), k to end
Ridge 37 = Ridge 36
Ridge 38 = Ridge 36
Ridge 39: (C1) k to 8 bef m, (C2) k to end;
   turn; (C2) k to m, k8, (C1), k to end
Ridge 40 = Ridge 39
Ridge 41 = Ridge 39
Ridge 42 = Ridge 39
Ridge 43 = Ridge 36
Ridge 44 = Ridge 36
Ridge 45 = Ridge 36
Ridge 46 = Ridge 34
Ridge 47 = Ridge 34
Ridge 48 = Ridge 32
Ridge 49 = Ridge 32
Ridge 50 = Ridge 31
Ridge 51 = Ridge 30
Ridge 52 = Ridge 29
Ridge 53 = Ridge 28
Ridge 54 = Ridge 27

Repeat ridges 1 to 54 until the piece is as long as you'd like it to be, but end with ridge 53.
For the cowl in the pictures I knitted the sequence a total of 5 times.


Put the stitches of the provisional CO on another knitting needle. Hold ends together (see photo above). Then graft in garter stitch as follows: (C1) graft to marker; (C2) graft to end.


Chart
Below you can find the pattern as a chart - not the total width but the interesting bit around the stitch marker.
  • The dark purple line shows where the stitch marker is.
  • The pink line shows where to change the knitting color. As an additional help, the numbers in the chart show, how far from the marker the color change happens, i.e. how many stitches before or after the marker.
  • The background color (light pink or weight) is only there to make it easier to count the rows. It changes every 5 rows.